|

1. The Tools window
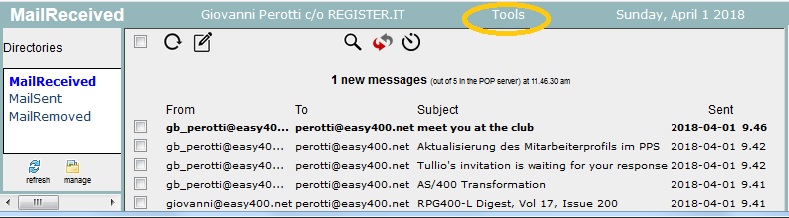
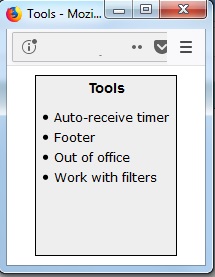
The Tools window (Figure 2) is opened by pressing the saying "Tools" at the center of the dark-cyan top bar
of the mailer screen (see Figure 1).
|
|
| Figure 1 - AMailer screen
|
|
Figure 2 - The Tools window |
2. Auto-receive timer
|
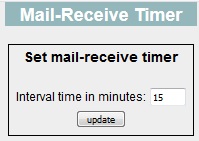
| Figure 3 - Auto-receive timer |
|
When, in the screen of Figure 1, the icon
 is pressed,
the icon changes to is pressed,
the icon changes to
 ,
an "automated mail-receive" function is started and incoming messages to the current AMailer user are repeatedly received every given number of minutes. ,
an "automated mail-receive" function is started and incoming messages to the current AMailer user are repeatedly received every given number of minutes.
To set this interval time, select the option "Auto-receive timer" in the tools pop-up. The pop-up in Figure 3 shows up and you can then set
the desired interval time (in minutes). The "automated mail-receive" function will adopt the new interval time at its next repetition.
|
3. Footer
You may define a footer text to be automatically added to your
- new messages
- replies
- forwards
4. Out of office
The Out-of-office tool will
- reply with a user-defined message to all incoming messages
- and optionally copy all incoming messages to a user-defined delegated e-mail address
during your absence.
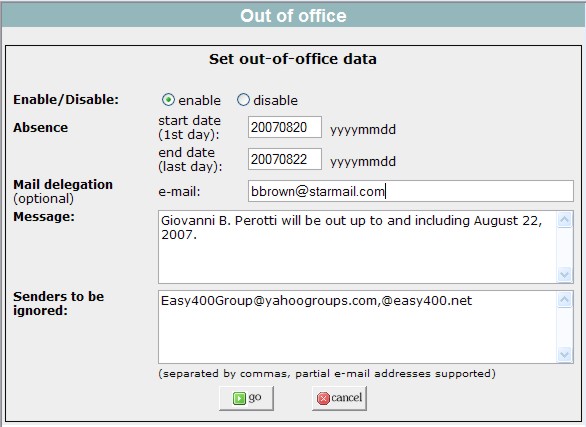
Press the saying "Out of office" in the "Tool" window (see Figure 2) to display the
"Out of office" window (Figure 5):
Operate as follow:
- Enable/Disable:
- Press the enable radio button to enable the out-of office function, or
- press the disable radio button to suspend the sending of messages and the mail delegation
(the out-of-office data will remain in place, but inactive, for the next out-of-office event).
- Absence:
Enter the dates of the first and of the last absence day.
Make sure that both dates are in the format year-month-day.
- Mail delegation:
- if you want that - during your absence days - your incoming mail is copied to a delegated person,
type the e-mail address of this delegated person
- if you do not want to delegate your mail, leave the delegated e-mail address as blank
- Message:
Type the message you want to be sent to the senders of your incoming mail.
A default message appears the first time you use this tool.
If you specify any dates within this message, it is your responsibility to make sure that such dates
match the Absence dates.
- Senders to be ignored:
If you want, you may specify a list of sender e-mail addresses to be ignored.
If an item in this list is found to match the sender's e-mail address, or
is found in the subject of the message, then the out-of-office message is not sent.
Entries in this list must be separated by commas.
Instead of a full e-mail address, you may specify a partial e-mail address (for instance, just the domain):
all the senders, containing that string in their e-mail address, will be ignored.
None of the out-of-office features (reply message, delegated mail) do work for incoming messages arriving from "Senders-to-be-ignored"
or containing one of the "Senders-to-be-ignored" in the subject.
- go / cancel buttons:
- Press the go button to activate your inputs, or
- press the cancel button to exit from this tool without doing anything.
5. Filters
Filters are user-defined rules about the destination of their incoming mail messages, when some conditions are met.
Basically there are two types or rules:
- store a message in a directory other than the MailReceived one
- flag a message as "deleted": this message becomes invisible and will be deleted on the next mail receive.
When on the Tools window you press the link "Filters", you receive a "Work with Filters" window which looks like the one in Figure 6:
|
| Figure 6 - Sample Work with Filters window |
In this case the user has defined three filters:
- Any incoming message sent from an email address with domain easy400.net is stored in directory "New customers" instead of directory "MailReceived".
- Any incoming message sent from an email address with domain snail_mail.net is discarded, that is made invisible and ready for been deleted on the next mail receive.
- Any incoming messages containing the word "loan" in the subject is stored in directory "MailSPAM" instead of directory "MailReceived".
You can click the small icons at the beginning of each row to update or to delete a filter.
To add a new filter, click the button "add filter". In this way you receive the screen in Figure 7:
|
| Figure 6 - Adding a new filter |
The following images show the possibilities provided for each of the four filter elements:
Argument, Condition, Compare value and Action.

|