You will be asked to logon with user_profile/password.
You must logon with a user profile CLASS(*SECOFR).
This is needed
for security reasons
because creating an user requires special authorities
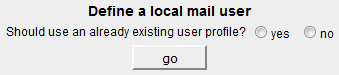
Initially, as no user account is defined yet, you would receive the screen in Figure 1.
Once some user accounts have been created, you would also receive a list of the existing users (see Figure 10).
To create a new user account, press the button "new user".
You will receive the screen in Figure 2.
Figure 2 - Select the type of user account
Note - The restriction for a Local User to receive mail only from local SMTP clients can be removed in the way illustrated at this topic.
2. Define an Internet user account
Internet users are users already defined at an ISP (Internet Service provider).
They usually get their mail on a PC mailer (e.g. Outlook) connected to the ISP POP3 server
via an appropriate account definition.
In this case, AMailer will generate an account definition able to connect to the ISP
POP3 server in order to receive the mail addressed to this Internet user.
Worth be noted that this AMailer account will not connect to the ISP SMTP server to send mail.
Mail will be sent from the IBM i SMTP server.
Important note- You must make sure that the ISP POP3 server is a supported POP3 server.
The supported POP servers are:
The traditional basic POP3 server
Microsoft Exchange POP3 server
AMailer would not be able to receive incoming mail from other POP3 servers.
Use the following procedure to check out the pop server you care for:
Find out the IP address of the ISP POP3 server.
If you do not know its IP address, just ping the DNS name of the ISP POP3 server to find it.
The DNS name of the POP3 server can be found from the pc-mailer (e.g. Outlook) account.
From your IBM i Command Entry screen run command TELNET RMTSYS('IP address_of_the_ISP_POP_server') PORT(Port_of_the_ISP_POP3_server)
usually the Port_of_the_ISP_POP3_server, is port 110
As a result of this TELNET command, the local POP3 server should respond in one of these ways:
Figure A03 - Traditional basic POP3 server
Figure A04 - Microsoft Exchange POP3 server
If you get no response, or you get a response different from one of the above,
then the ISP POP3 server is NOT a supported one and AMailer cannot correctly receive mail from it.
Local account data
The following is needed for defining the account on the IBM i:
Local account ID
This is a unique name (usually the last name or an acronym, example Frank) identifying this user.
This Local account ID is requested by validation list QGPL/AMAILER when willing to log on through Amailer as this user.
It is case sensitive.
Full name
Full name of the user.
This piece of information is used to create the sender's name on the outgoing mail.
Validation list password for local logon / verify
This is the password associated to the Local account ID, that is requested by validation list QGPL/AMAILER when willing to log on through Amailer as this user.
It is case sensitive.
Internet e-mail address when sending messages
This is the e-mail address to be used as sender's address in the outgoing mail.
This must be the same as the e-mail known for this user at her/his ISP.
Options for sending mail
The following information is used to generate outgoing mail:
Character set
See this page
for a list of registered character sets.
Please note that, in this case, the character set is taken from the value set by command MMAIL/CHARSET and cannot be changed.
Reply-to e-mail
The e-mail address where reply-to messages should be addressed.
This is usually the sender's e-mail address (as the default value "*sender" suggests),
but could be different.
Return-path
The e-mail address where non-delivery messages ("bounce" messages) should be addressed
(non-delivery messages are messages stating that the recipient could not be reached).
This is usually the sender's e-mail address (as the default value "*sender" suggests),
but could be different.
However, it must be noted that usually end-receving SMTP servers do ignore this type of information.
Parameters for receiving mail
The following information is need to receive mail from the IPS POP3 server:
ISP POP3 server
You may choose between the DNS name of the POP3 server (host name of the POP3server) or the IP address of the POP3 server.
DNS name of the POP3 server - This is the safest way.
The IP address of the POP3 server - used to perform the connection - will be automatically retrieved whenever needed and you do not need to be concerned about its possible changes.
The DNS name of the POP3 server can be found from the pc-mailer (e.g. Outlook) account.
IP address of the POP3 server - If you select this option, you will have to check now and then if the IP address has been changed by its ISP.
If you do not know the IP address, just ping the DNS name of the ISP POP3 server to find it.
Is it a SSL POP3 server?
Port number of the ISP POP3 server
When a non-SSL POP3 is used, usually the port number is 110.
When a SSL POP3 is used, usually the port number is 995.
User name at the ISP POP3 server
The user name this user is registered at the ISP site.
It can be found from the pc-mailer (e.g. Outlook) account.
Password at the ISP POP3 server / verify
This must be reported by the user. It is case sensitive.
Options for receiving mail
Retain mail at the ISP POP3 server after receiving it
This option tells whether the POP3 server should retain the mail messages after they have been received by AMailer.
If this is done ("yes"), the user could retrieve again the same mail messages also from the pc-mailer (e.g. Outlook).
Remove mail at the ISP POP3 server after local deletion
This option tells whether the POP3 server should be instructed to remove mail messages after they have been locally
deleted in AMailer.
A "yes" here makes sense only if the answer to the previous question was also "yes".
Log all communications with the ISP POP3 server
This is a debugging tool to be very careful with, as it could generate tons of record on file QGPL/POP3LOG.
Note on Privacy - The following pieces of information are recorded in ciphered mode:
Validation list password for local logon
User name at the ISP POP3 server
Password at the ISP POP3 server
Note on account properties -
Users can change their accounts properties after loggin to AMailer.
3. Define a Local user account
Local users can
exchange mail among themselves
exchange mail with Internet users defined to AMailer on the same IBM i they are connected to
send mail to external Internet mail addresses
but cannot receive mail from external Internet mail users, as their POP3 server, the IBM i POP3 server, cannot be reached from the outside. Note - The restriction for a Local User to receive mail only from local SMTP clients can be removed in the way illustrated at this topic.
A Local user receives mail from the IBM i POP3 server, while outbound mail is sent from the IBM i SMTP server.
In order to work, a Local user account needs the following be defined:
An user profile
A system directory entry for the user profile
A SMTP alias entry for the directory entry
The system directory entry must specify in parameter SYSNAME the system name as it appears from command dspneta.
Besides, the system name shouuld be an entry in the TCP/IP Host Table.
The IP address specified in this entry is the address to be used as IP address of the local POP3 server.
For more information on this subject, see Appendix A.
AMailer allows to create a Local user
Either on an existing user user profile: in this case, the related system directory entry and SMTP alias table entry are created only if they do not exist already,
otherwise they are kept as they are.
Creating Local users over existing user profiles is the correct approach when a user profile is already active in local mail exchange.
OR by creating a new user profile, a related system directory entry and a SMTP alias table entry from scratch.
This is the correct approach to be used when a Local user profile is not yet available for local mail exchange.
Important note - Before creating, changing or removing Local user accounts,
make sure to run the following commands:
ENDTCPSVR *SMTP
ENDTCPSVR *POP
and to restart these TCP servers after performing this job.
select the "Local" radio button (and press the "go" button)
You will receive the following screen:
Figure 3A1 - Whether to use an existing user profile
Select the "no" radio button (and press the "go" button)
to receive the next screen:
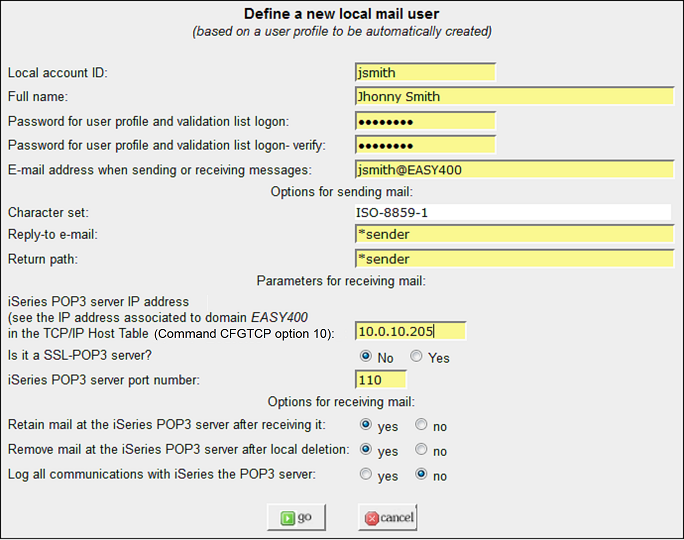
Figure 3A2 - Creating a Local user from scratch
The creation of a Local user from scratch results into the creation of an user profile, a system directory entry and the related SMTP alias table entry.
Local account data
The following is needed for defining the account on the IBM i:
Local account ID
This is a unique name (usually the last name or an acronym, example "jsmith"), case sensitive, identifying this user.
This Local account ID is requested by validation list QGPL/AMAILER when willing to log on through Amailer as this user.
Full name
Full name of the user.
This piece of information is used to create the sender's name on the outgoing mail.
New password for user profile and validation list logon / verify
This is the password associated to the user profile and the validation list entry which will be created.
It is case sensitive.
E-mail address when sending or receiving messages
The local e-mail address has the format user_name@domain_name
The user name must be unique within the domain name.
The domain_name must be the same as the system name and must be associated to an active IBM i interface
(see this page).
Options for sending mail
The following information is used to generate outgoing mail:
Character set
See this page
for a list of registered character sets.
Please note that, in this case, the character set is taken from the value set by command MMAIL/CHARSET and cannot be changed.
Reply-to e-mail
The e-mail address where reply-to messages should be addressed.
This is usually the sender's e-mail address (as the default value "*sender" suggests),
but could be different.
Return-path
The e-mail address where non-delivery messages ("bounce" messages) should be addressed
(non-delivery messages are messages stating that the recipient could not be reached).
This is usually the sender's e-mail address (as the default value "*sender" suggests),
but could be different.
However, it must be noted that usually end-receving SMTP servers do ignore this type of information.
Parameters for receiving mail
The following information is need to receive mail from the local POP3 server:
IBM i POP3 server IP address
The IP address of the local POP3 server
(see this page).
Is it a SSL POP3 server?
IBM i POP3 server port number
The port where the local POP3 server is listening.
If the local POP3 server is not SSL based, this is usually port 110, however see this page.
If the local POP3 server is SSL based, usually itb listens on port number 995.
Options for receiving mail
Retain mail at the IBM i POP3 server after receiving it
This option tells whether the POP3 server should retain the mail messages after they have been received by AMailer.
If this is done ("yes"), the user could retrieve again the same mail messages also from the pc-mailer (e.g. Outlook).
Remove mail at the IBM i POP3 server after local deletion
This option tells whether the POP3 server should be instructed to remove mail messages after they have been locally
deleted in AMailer.
A "yes" here makes sense only if the answer to the previous question was also "yes".
Log all communications with the ISP POP3 server
This is a debugging tool to be very careful with, as it could generate tons of record on file QGPL/POP3LOG.
Note on Privacy - The following pieces of information are recorded in ciphered mode:
Password for user profile and validation list logon
Note that the validation list password and the user password must be kept identical.
Note on account properties -
Users can change their accounts properties after logging to AMailer.
3B. Define a Local user account based on an existing user profile
select the "yes" radio button (and press the "go" button).
You will receive the following screen:
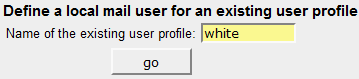
Figure 3B1 - Specifing an existing user profile for a new Local account
Type the name of an existing user profile and press the "go" button. You will receive the following screen:
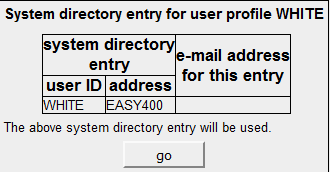
Figure 3B2 - Status of the existing user profile
This screen is for information only.
In this case, the user profile has a related system directory entry, but no SMTP alias table entry.
When the SMTP alias table entry and/or the system directory entry are not available, they are automatically created during the account generation process.
Just press the "go" button to continue with the next screen.:
Figure 3B3 - Define a nerw Local account based on an existing user profile
The creation of a Local account from an existing user profile results into the creation of a system directory entry and a related SMTP alias table entry if they were missing.
Local account data
The following is needed for defining the account on the IBM i:
Local account ID
This is a unique name (usually the last name or an acronym, example "jsmith"), case sensitive, identifying this user.
This Local account ID is requested by validation list QGPL/AMAILER when willing to log on through Amailer as this user.
Full name
Full name of the user.
This piece of information is used to create the sender's name on the outgoing mail.
New password for validation list logon / verify
This is the password associated to the the validation list entry which will be created. It is case sensitive.
Please note that this password must match the user profile password.
In case of a mismatch, the local POP3 server will reject any attempt to logon as this user.
E-mail address when sending or receiving messages
The local e-mail address has the format user_name@domain_name
The user name must be unique within the domain name.
The domain_name must be the same as the system name and must be associated to an active IBM i interface
(see this page).
Options for sending mail
The following information is used to generate outgoing mail:
Character set
See this page
for a list of registered character sets.
Please note that, in this case, the character set is taken from the value set by command MMAIL/CHARSET and cannot be changed.
Reply-to e-mail
The e-mail address where reply-to messages should be addressed.
This is usually the sender's e-mail address (as the default value "*sender" suggests),
but could be different.
Return-path
The e-mail address where non-delivery messages ("bounce" messages) should be addressed
(non-delivery messages are messages stating that the recipient could not be reached).
This is usually the sender's e-mail address (as the default value "*sender" suggests),
but could be different.
However, it must be noted that usually end-receving SMTP servers do ignore this type of information.
Parameters for receiving mail
The following information is need to receive mail from the local POP3 server:
IBM i POP3 server IP address
The IP address of the local POP3 server
(see this page).
Is it a SSL POP3 server?
When the communication to the POP3 server is through Secured Socket Layer (SSL),
you must use DCM (Digital Certificate Manager) and create a Certificate Store needed by SSL,
see this page.
IBM i POP3 server port number
The port where the local POP3 server is listening.
If the local POP3 server is not SSL based, this is usually port 110, however see this page.
If the local POP3 server is SSL based, usually itb listens on port number 995.
Options for receiving mail
Retain mail at the IBM i POP3 server after receiving it
This option tells whether the POP3 server should retain the mail messages after they have been received by AMailer.
If this is done ("yes"), the user could retrieve again the same mail messages also from the pc-mailer (e.g. Outlook).
Remove mail at the IBM i POP3 server after local deletion
This option tells whether the POP3 server should be instructed to remove mail messages after they have been locally
deleted in AMailer.
A "yes" here makes sense only if the answer to the previous question was also "yes".
Log all communications with the ISP POP3 server
This is a debugging tool to be very careful with, as it could generate tons of record on file QGPL/POP3LOG.
Note on Privacy - The following piece of information is recorded in ciphered mode:
Password for validation list logon
Note that the validation list password and the user password must be identical.
Note on account properties -
Users can change their accounts properties after logging to AMailer.
4. Extend a Local user account to exist in the outside Internet world
This topic illustrates how you can make IBM i mail local accounts exist in the Internet, so that they can also receive mail messages from the outside world.
In other words, this topic tells how you can have your IBM i supporting mail boxes as if it were just another ISP mail server.
4a. Add a MX record to your IBM i DNS configuration
First of all, your IBM i must be defined through a domain name.
As an example, the IBM i supporting this site can be reached through domain name easy400.net at IP address 178.249.3.55. This is defined at ISP www.register.it.
What I did was to logon at my ISP, ask for my domain name www.easy400.net DNS configuration and
add an A record named mail.easy400.net with the same IP address 178.249.3.55
add a MX record related to the previous A record mail.easy400.net.
Note. - You should however make sure that your Internet Service Provider (ISP) allows to use a mail service different from the one provided by his Company.
If that is not allowed, logging to the IBM i POP server may be rejected by the ISP mail service.
My original DNS Configuration at ISP "register.it" supporting three HTTP instances, ISP FTP server and ISP POP3 mailbox "easy400.net"
Name
Type
Value
www.easy400.net
A
178.249.3.55
cgidev2.easy400.net
A
178.249.3.55
mmail.easy400.net
A
178.249.3.55
ftp.easy400.net
CNAME
easy400.net
pop.easy400.net
CNAME
mail.register.it
easy400.net
MX 10
mail.register.it
Updated DNS Configuration at ISP "register.it" to create a POP3 mail box named "mymail.easy400.net" residing on my IBM i (IP addr. 179.249.3.55)
Name
Type
Value
www.easy400.net
A
178.249.3.55
cgidev2.easy400.net
A
178.249.3.55
mmail.easy400.net
A
178.249.3.55
mymail.easy400.net
A
178.249.3.55
ftp.easy400.net
CNAME
easy400.net
pop.easy400.net
CNAME
mail.register.it
easy400.net
MX 10
mail.register.it
easy400.net
MX 20
mymail.easy400.net
4b. Update the e-mail addresses of your local mail accounts
In this way, my local IBM i accounts could now be reached from the Internet by adding @mail.easy400.net to their account names.
For instance, I used to have a local mail account previously defined (see Figure 3A2) as jsmith@easy400.
I used the mailusersChange option to redefine it as jsmith@mmail.easy400.net
and when I sent a message from Internet to this e-mail address,
it was immediately available at its IBM i mail box, so that I could receive it through AMailer from the IBM i POP3.
4c. Update your SMTP attributes
If you are on OS/400 release V7R2 or subsequent, make sure to run command CHGSMTPA VFYID(*NO) .
This is required to force the local POP3 to accept the username of the addressee when receiving mail from the outside.
4d. Define the IBM i "ex-local" account to your mailer
Though AMailer and command PRCUSRMAIL can of course be used to receive the incoming mail, this can also be done through a conventional PC mailer,
such as Microsoft Outlook.
The following tells how you can define the appropriate account to, say, Outlook.
User information
Name: any name is OK
E-mail address: the e-mail address specified for this local mail account in Figure 3A2, example: jsmith@mmail.easy400.net .
Server information
Account type: must be POP3 .
Incoming mail Server: the domain name of the IBM i box, example: mail.easy400.net .
Outgoing mail Server (SMTP): select one of the following
The SMTP server provided by your ISP
Domain name of the IBM i box (example: mail.easy400.net) to use the IBM i box SMTP.
This however requires command CHGSMTPA specify parameter "Allow relayed mail ALWRLY(*YES)" and the IP address of your PC be added through command
ADDSMTPLE TYPE(*ACCEPT) INTNETADR('nnn.nnn.nnn.nnn'). Do not use this option if your PC has a dynamic address!
Access information
User name: the name of the local user profile (see Figure 4, column "local user profile").
Password: the password of this local user profile.
5. Change or remove an user account
Once one or more user accounts are defined, the URL
http://.../mailusers
provides a list of the existing user accounts:
Figure 4 - Table of the existing user accounts
From this screen you may update or remove user accounts.
The update screens are similar to the ones used for creating user accounts, with the restriction that the Account ID cannot be changed.
Also note that, after logging to AMailer, an existing user may update his own account.
6. A way to bypass remote POP3 connection problems
If the remote EMail account supports the forwarding of the incoming mail to another "external" EMail account, you may use an alternate way of receiving EMail message on your IBM i.
On your IBM i create a "local-Internet" account. See
On your remote EMail account select the option to forward the incoming mail to your IBM i "local-Internet" account.
You may then receive and process mail messages from your local IBM i POP3, without using SSL at all!
At least two EMail servers support mail forwarding to an "external" mail account:
GMail
Logon to your GMail account.
Click on the top right corner Gear-icon and click on "Settings".
Click "Forwarding and POP/IMAP" tab.
Click button "Add a forwarding address and follow instructions.
Yahoo
Open your Yahoo account mail.
Click on the top right corner Gear-icon and choose "Settings" option.
Select "Account" tab and click on edit button of default yahoo account.
After clicking on this a window pop-up here, now check the forward Yahoo mail to another Email address.
After specifying the Email address where mail should be forwarded, at that Email address you will receive a confirmation letter, and you must click the confirmation link.
Upon clicking the confirmationlink, you receive a new WEB page:
Roll down until you see Manage your email addresses and in column "Set As Primary" check the radio button corresponding to the e-mail account where the incoming mail should be forwarded.
7. Communicating between mailboxes
You may use MMAIL/EML... commands or the AMailer webmail to send email messages from a local mail-box to other local or Internet mail-boxes.
You may use the AMailer webmail to receive into local mail boxes email messages available in another local or Internet mail-box, and display / archive locally those email messages.
Page Email Connections provides a table of the possible connections.